
Wireless Touch Controller
| Place of Origin | China |
|---|---|
| Brand Name | okled |
| Model Number | RF305 |
| Inquiry | |
Detailed Product Description
Product Specification
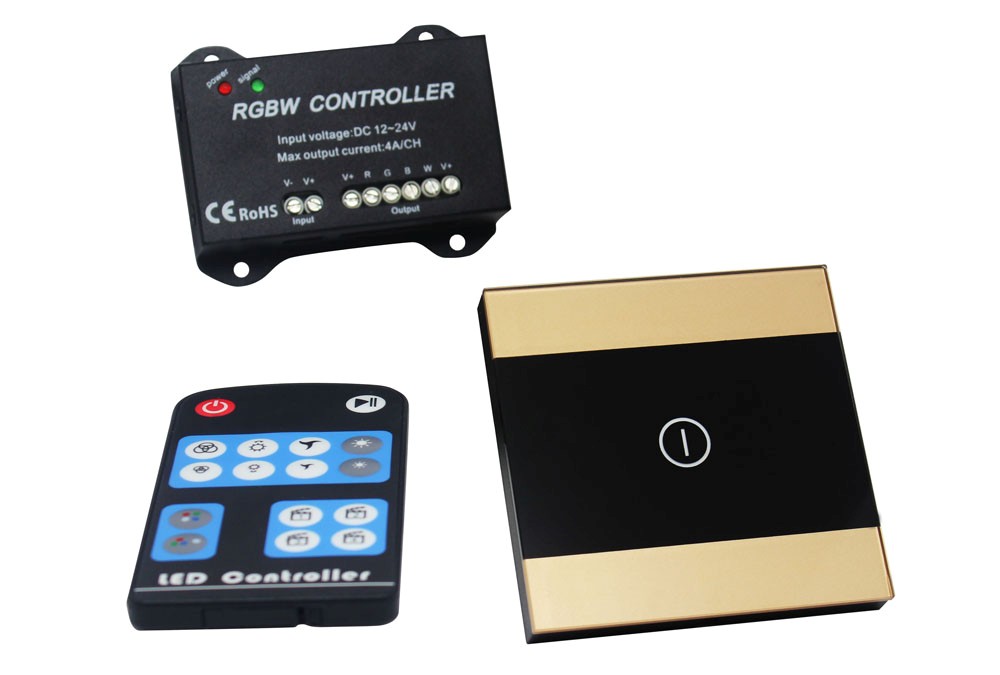
Name: Wireless Touch Controller
Model: RF305

Summarization
Touch three sets of controllers is a multifunction controller, mainly used for controlling 4 channel lamps, it supports switch the mode from RGBW to RGB+W, at the same time, under each large mode, it supports switch mode from 39 kinds small mode; This controller can control RGB and RGBW lamps, users no need to purchase a variety of controller, then can achieve the effect you want, also RGBW mode can realize pure white light effect that RGB lamps and lanterns can't reach. Also, this remote controller is not only with hand-by button remote control, but also with touch remote, made it looks elegant and fashionable, easy to operate.
Technical parameters
Working temperature: -20-60°C
Controller supply voltage: DC 12-24V
Touch remote supply voltage for: AC 90~240V
Controller ouput voltage: DC 12-24V
Output connect way: common anode (6 line with 4 loop)
Controller external dimension: L76.6 * W59 * H22.2 mm
Packing size: L185 * W116 * H56 mm
Net weight: 287g
Gross weight: 356g
Remote control static current: <10uA
Maximum output current : 4*4A
Maximum output power: 192W/12V 384W/24V
Remote control distance: <=25M
External Dimension
 Controller
 Touch remote
Button function instruction

Direction for use
1. Touch remote control instruction
The backlight of touch controller is on in normal state, the lights will extinguish when touch the button, it’s convenient for customers to use in the dim condition.
 Turn on/off and brightness/speed adjustment key. Short press it, you can turn on/off
the controller at any state. Long press this key, if the controller is in the off state, the controller will turn on. On the contrary, when controller is in the on state: 1) In the static mode, you can adjust the brightness by long press this key, the adjustment way as follows: press this key all the time, then the brightness will add (default first adjustment increase brightness) until at the brightest. Press the key again, the brightness will decrease until dimmest. Turn off controller or power off, the state of brightness and speed adjustment will contrary with the last time.2). In the dynamic mode, adjustment ways is similar to static mode.
2. Remote control instruction
This remote has 16 buttons. Unless specified, otherwise, signal light flashes for one time by each clicking. The specific keys function is as follows:
 on/off key, you could turn on/off controller at any state;
 Pause key. Under on state, press the pause button, the controller will maintain the
current state, the signal light will always bright, except the on/off key, all other buttons are invalid, until press the pause button again or on/off key to restart the controller to unlock the pause state, the signal light will off.
 Mode increase key, the mode adds 1 by each pressing, mode table is shown in Table I and Table 2.
 Mode reduce button, the mode minus 1 by each pressing. Mode table is as shown in
Table1 or Table2.
 Brightness increase button, in static mode, brightness series add 1 by each
pressing,until up to the brightest, altogether 16 levels.
 Brightness reduce button, in static mode, brightness series minus 1 by each
pressing,until down to the darkest, altogether 16 levels.
 Speed increase button, in dynamic mode, speed series add 1 by each pressing,
until increase to the fastest, altogether 16 levels.
 Speed reduce button, in dynamic mode, speed series minus 1 by each pressing,
until reduce to the slowest, altogether 16 levels.
 White light increase button, in RGB+W mode, brightness series of white light will add 1 by each pressing, until add to the brightest, altogether 16 levels.
 White light reduce button, in RGB+W mode, brightness series of white light will minus
1 by each pressing, until reduce to the darkest, altogether 16 levels.
the fourth channel white light will instead of the white light of the RGB tricolor composite. As show in Table I. mode, the fourth channel white light and three channel RGB are independent, white light will be always on, and also you can adjust brightness separately, the specific mode is as shown in Table 2. signal light will flash for six times quickly when save the scene successfully. Each button can save a scene respectively in RGBW and RGB+W mode. signal light will flash for six times quickly when save the scene successfully. Each button can save a scene respectively in RGBW and RGB+W mode. signal light will flash for six times quickly when save the scene successfully. Each button can save a scene respectively in RGBW and RGB+W mode. signal light will flash for six times quickly when save the scene successfully. Each button can save a scene respectively in RGBW and RGB+W mode. RGBW mode key, press this key, controller will be in the RGBW mode, in this mode,
  RGB+W mode key, press this key, controller will be in the RGB+W mode, in this
  Scene 1: you could save the current scene by long pressing the button, the green
  Scene 2: you could save the current scene by long pressing the button, the green
  Scene 3: you could save the current scene by long pressing the button, the green
  Scene 4: you could save the current scene by long pressing the button, the green


3. Operating instructions of button on the controller
Match code key, controller is in normal power state, press and hold the key, at the same time press the on/off key for 3 seconds can match code, after matching code successfully, the signal light flashes for six times quickly.
The Function key, short press this key, the mode of controller addes 1, signal light flashes for one time. When the model is added to the last one, and then click it, the mode will be back to the first mode. Long press it for 3 seconds, can turn on/off the controller, signal light flashes for one time.
Typical Applications

Installment Directions:
1)Wire connection:
Wire connection sketch picture please consult the connector instruction.
2)Open the touch panel:

3)Controller foundation installment:
As following pictures, wires connected then put the touch controller installed in the cassette, screwed it, let fasten, after it put the foundation installed at the wall.

4)Cover the touch panel:
Pay attention on the direction of panel, cover the panel as follows:

Notes:
Please ensure short circuit can not occur between input and output connecting wire before you turn on the power;