

RF Programmable Dimming Driver(Constant Current)
| Place of Origin | Shenzhen |
|---|---|
| Brand Name | Okled |
| Model Number | PS400 |
| Inquiry | |
Detailed Product Description
Product Specification
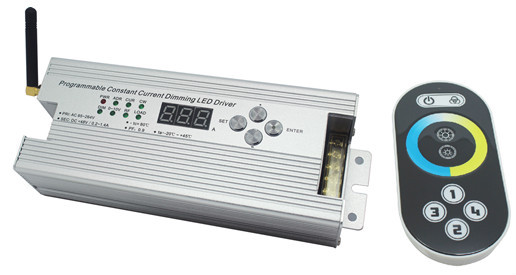
Name: Wireless Constant Current Programmable Dimming Driver
Model: PS400
Summarization
2.4G wireless constant current programmable dimming controller is a multifunction LED lighting constant current controller for adjusting color temperature and dimming, which can realize 0.2-1.4A constant current output. It is equipped with touch remote controller which adopts high precision capacitive touch control technology and used with touch color wheel, so that you can select the color you want by one button conveniently and quickly. Each controller has a globally unique address code, in order to prevent confusion caused by controlling repeated address code. Each controller can be equipped with 4 remote controls, can achieve multiple controllers synchronization control. It is used to control all kinds of panel lights and realize the function of adjusting brightness, color temperature and current.
Technical Parameters
Controller
Working temperature: -20-45℃
Supply voltage: AC85-264V
Output: 2 channels
External dimension: L203 * W77.5 * H49mm
Packing size: L208 * W83 * H54mm
Net weight: 721.7g
Gross weight: 8000g
Static power consumption: 2W
Output current: 0.4-1.4A
Output voltage: < 48V
Output power: 67.5W
Remote control
Working temperature: -20-60℃
Power supply method: AAA*3
Supply voltage: 1.5V*3
Emission frequency: 2.4 GHz
Standby power: 0.015mW
Standby current: 60uA
Working current: 200uA
Emission current: 10mA
Remote control distance: About 30m
Standby time: 6 months
Weight of remote control: 94g
Controller Interface Instruction
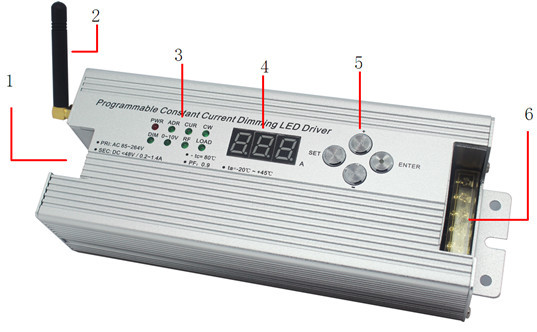
Input: controller power supply input port;
Antenna: 2.4G remote signal receiving antenna;
Indicator light: indicator light of power and mode. It flickers when the data is changed;
Nixie tube: It shows each parameter value;
Button: adjust each parameter;
Input/output interface: 0-10V input and load output port.
Direction for use of controller buttons
1. SET: key of setting
Press SET, you can select mode cyclically. Each mode corresponds to 1 LED lamp, corresponding LED of the selective mode will light up (flicker in edited state). When the setting is done, you can press ENTER to save it.
Corresponding functions of 8 LED lamps are as follows:
Power PWR: Power supply indicator light, it will light up when connected with external power supply;
Address ADR: Provide address settings of group 1-4;
Current CUR: you can set current 0.4-1.4A;
Color temperature CW: 1-127 color temperature adjustable;
Dimming DIM: 5-100 grading dimming;
0-10V: color temperature adjustable, RF is unable to use at this time;
RF: you can use remote control, 0-10V is unable to use at this time.
2. +: parameter +
3. - : parameter -
4. ENTER: confirm
Examples of operation:
Dimming setting: Press SET, choose dimming mode, then press +, set dimming value to 100, press ENTER to save it. DIM dimming indicator light will stop flickering and the brightness of load lamp will reach the brightest.
Address setting: Press SET, choose address mode, then press +, set address to 001, press ENTER to save it. ADR indicator light will stop flickering and the address of this controller is 001.
Matching code of remote control
The controller can be controlled simultaneously by four remote controls, firstly, you need to match the controller with remote control. When matching code, you need to use “SET” with “DIP”. Set the address of controller as “001”, long press “ENTER” and then touch the on/off key of remote control until Nixie tube shows “OFF”, that means the address code is matched successfully, other three groups is the same.
Clearing code, in the process of using controller, if you no longer want to use the remote control that already match code, then you can achieve it by clearing code, methods of operation: controller is powered off, press and hold “+” key, then power on, test it with remote control, if you could not control with the remote control, indicates the operation is successful, otherwise repeat this operation.
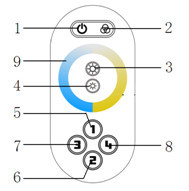
Remote control Instruction
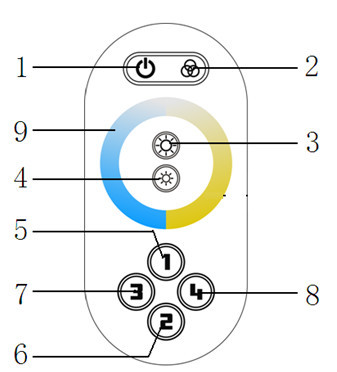
1. On/off 2. Group control 3. Brightness + 4. Brightness -
5. Group 1 6. Group 2 7. Group 3 8. Group 4
9. Color temperature adjusting wheel
Direction for use of remote control
The functions of buttons in remote control touch panel are as follows:
1. On/off key: in RF state, you can turn on/off;
2. Group control: selecting all controllers that address code is matched with the remote control, then it can achieve overall control of all controllers;
3. Brightness +: overall brightness increase, every time you press this button, the brightness series
add 1;
4. Brightness -: overall brightness reduce, every time you press this button, the brightness series
minus 1;
5. Group 1: selecting all controllers that address code is matched with the remote control and group address is 1, achieve overall control of all controllers;
6. Group 2: selecting all controllers that address code is matched with the remote control and group address is 2, achieve overall control of all controllers;
7. Group 3: selecting all controllers that address code is matched with the remote control and group address is 3, achieve overall control of all controllers;
8. Group 4: selecting all controllers that address code is matched with the remote control and group address is 4, achieve overall control of all controllers;
9. Color temperature adjustment ring, it is used for adjusting proportion of color temperature.
Power Supply Management
Stop to use the remote more than 15-20s, the remote control will enter the standby state automatically, to extend the battery life. Color ring can not be used at this time, The next time use, first touch key wake up the remote control, then the remote will come back to the normal working state.
Typical Application
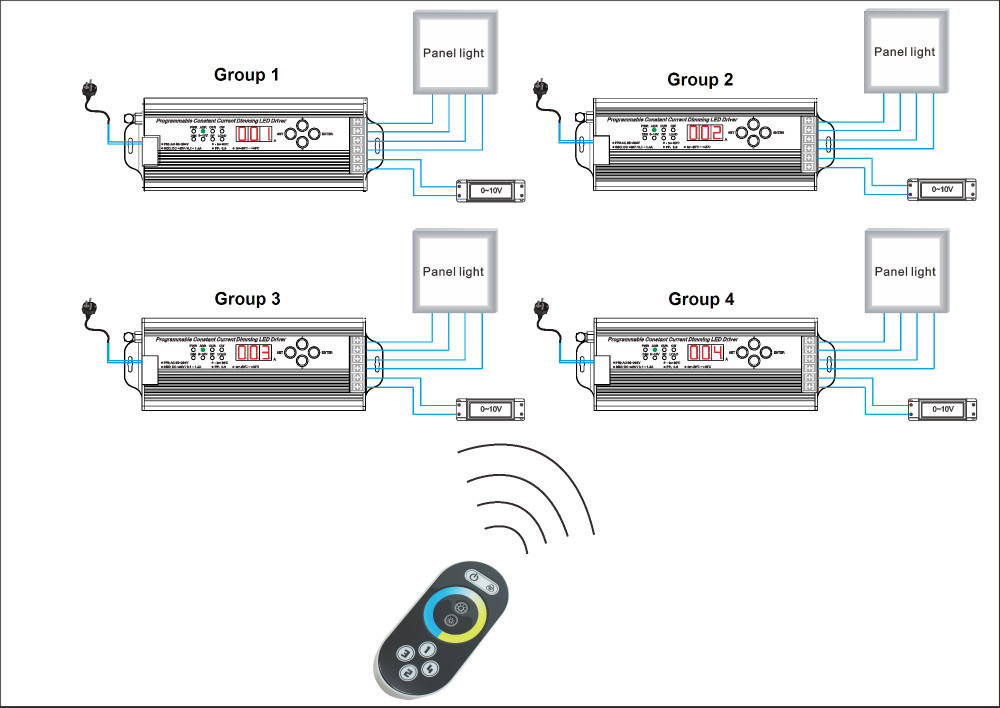
Address code is used for group controller. The series controller can be divided into 4 groups. It can carry out single control and overall control using remote control.
Using one remote control to achieve single control and overall control, you should operate according to the following steps.
Step 1: Matching code
You need to match code before using controller, otherwise you can not remote control. Please refer to “matching code of remote control”
Step 2: Group controllers
Address code of controllers is 1-4, if you choose “1”, then the controller belongs to group 1, if you choose “2”, then it belongs to group 2, the rest can be done in the same manner.
Step 3: controlling remote control
For the function of remote control, please refer to “Remote control direction for use”.
Group 1 control: firstly press “5” key on the remote control, and then you can control the first group, the control is invalid to other groups. If you want to control group 2, you need to press “6”, and other groups are the same. If you want to achieve overall control, you need to press “2” key, overall control button, and then you can achieve overall control.
Picture 7
Remarks:
1. Connect the load wire at first, following by the power wire; Please ensure short circuit can not occur between connecting wire before you turn on the powerï¼›
2. When not use touch remote control for long time, we suggest you to take down the batteries.