


72W IR integration controller
| Place of Origin | China |
|---|---|
| Brand Name | okled |
| Model Number | IR7201-05 |
| Inquiry | |
Detailed Product Description
Product Specifications
Name: IR Integrated Controller-72W
Model:IR7201-05

Summarization
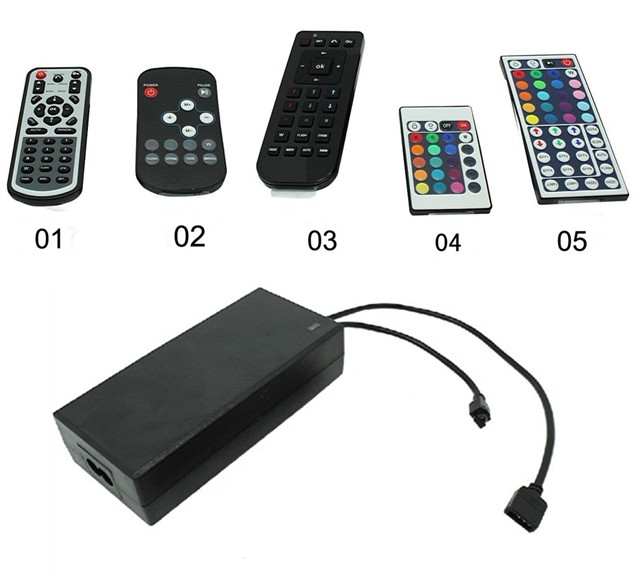
25 keys, 33 keys, 14 keys, 24 keys, 44 keys 72W infrared integrated controller built-in AC-DC converters, can be connected directly to low-voltage alternating current, it adopts advanced computer-controlled chips to control a variety of lamp whose source of light is LED. For instance, point source of light, flexible light strip, wall washer lamp, glass curtain wall light and so on; it has many advantages such as low price, easy connection and simple to use. You could adjust brightness, static color choices and various dynamic changes in lighting effects through infrared remote, and the line sequence is also can be setted. In addition, customer can adjust the lighting color according to their own needs.
Technical Parameters
| Working temperature | -20-60 °C |
| Supply voltage | AC90~265V |
| 0utput | 3 Channels |
| Connecting mode | common anode |
| External dimension | L135ΧW58ΧH34 mm |
| Packing size | L174ΧW153ΧH49 mm |
| Net weight | 223g |
| Gross weight | 265g |
| Static power consumption | <1 W |
| Output current | <1 A (each channel) |
| Output power | 72W |
External Dimension

Interface Specifications
Power input interface:

Adopt conventional power transposon as AC power input interface.
Infrared receiver:

Load output interface:

Adopt oblate interface.
The power wire:

Instruction for use
01#Remote(33 keys):
1. Connect the load wire before the power wire; Please ensure short circuit can not occur between connecting wire before you turn on the power;
2. When doing the operation, the remote should be faced toward infrared receiver. And ensure that there is no barrier between the remote and receiving head;
The key-press functions are showed as the table below:

3, When the user defines light color, press the custom colors key enter into custom color mode, and then press the six buttons (red color±, green color±, blue color±) to adjust the color (press any one of the key, except the six palette keys, can jump out from custom mode, then press the cancel button to return to the previous brightness setted). Press the OK button after adjustment, the current color values will be stored. When the custom colors key are pressed again, the last color values stored will be showed.
4, When the user sets line sequence, change the line sequence by every pressing SET button (There are six line sequences in total. When switch to the last line sequence, press the SET button again to switch to the first line sequence). And then press the OK button to confirm the setting.
5, When the user wants to lock all buttons of the remote, press lock key and all the buttons are locked, all keys unlock press the lock key again.
02# Remote:
1. Connect the load wire before the power wire; Please ensure short circuit can not occur between connecting wire before you turn on the power;
2. When doing the operation, the remote should be faced toward infrared receiver. And ensure that there is no barrier between the remote and receiving head;
The key-press functions are showed as the table below:

03# Remote(25 keys):
1,Connect the load wire before the power wire; Please ensure short circuit can not occur between connecting wire before you turn on the power;
2.When doing the operation, the remote should be faced toward infrared receiver. And ensure that there is no barrier between the remote and receiving head;
The key-press functions are showed as the table below:

3, When the user defines light color, press any one of the palette keys (red color±, green color±, blue color±) to enter into custom color mode. And then continue to press the palette keys to adjust color (press any one of the key, except the six palette keys and cancel key can jump out from custom mode, then press the cancel button to return to the previous brightness setted), press the OK button after adjustment, the current color values will be stored. If the 6 palette keys are pressed again, the last color values stored will be showed.
4, When the user sets line sequence, change the line sequence by every pressing SET button (There are six line sequences in total. When switch to the last line sequence, press the SET button again to switch to the first line sequence). And then press the OK button to confirm the setting.
5, When the user wants to lock all buttons of the remote, press lock key and all the buttons are locked, all keys unlock press the lock key again.
04# Remote(24 key):
1. Connect the load wire before the power wire; Please ensure short circuit can not occur between connecting wire before you turn on the power;
2. When doing the operation, the remote should be faced toward infrared receiver. And ensure that there is no barrier between the remote and receiving head;
The key-press functions are showed as the table below (according to the key position arrangement):

05# Remote(44 key):
1. Connect the load wire before the power wire; Please ensure short circuit can not occur between connecting wire before you turn on the power;
2. When doing the operation, the remote should be faced toward infrared receiver. And ensure that there is no barrier between the remote and receiving head;
The key-press functions are showed as the table below (according to the key position arrangement):

3,Additional remarks:
When the user define colors, press the custom key into the custom color model firstly, and then press the above six add and subtract red, green, blue keys can adjust color (press any other key outside custom regions, can jump out of custom mode, previously key invalid), when press custom key for the second time, the current color value will be stored. If custom key is pressed next time, will show the recent memory color value. The remote has six custom colors key, so you can set up arbitrary 6 kinds of colors, they are independent in each other, and won't influence each other. Such as press custom 1 key firstly, then click customize 2 key, custom 1 will be invalid. When press custom 2 key again, the current color value is to be stored.
Typical Applications
