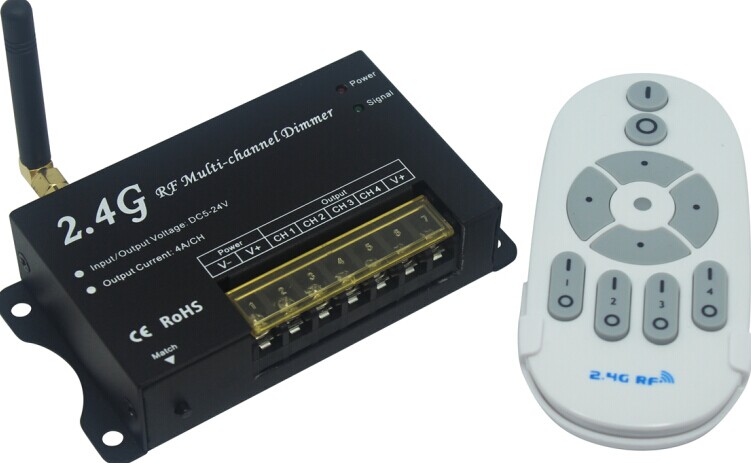

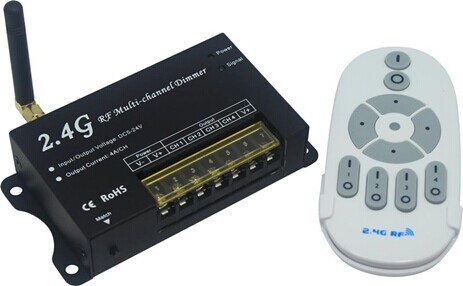
2.4G Wireless Multi-Channel Dimmer
| Place of Origin | China |
|---|---|
| Brand Name | Okled |
| Model Number | DM16 |
| Inquiry | |
Detailed Product Description
Product Specifications
Name: 2.4G Wireless Multi-Channel Dimmer
Model: DM16
Summarization
2.4G wireless multi-channel dimmer is a kind of controller which aims at each channel dimming separately, through dimming separately to each channel of controller, can achieve matching of different colors, thus a different color can show up. This controller has high dimming precision, with effect common dimmer can’t achieve.
.
Technical Parameters
Controller
working temperature: -20-60°C
supply voltage: DC12V-24V
output: 4 channels
connection mode: common anode
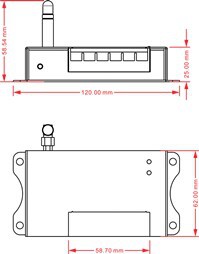
external dimension: L120ΧW62ΧH25mm
packing size: L185ΧW145ΧH55 mm
net weight: 293.3g
gross weight: 376.7g
static power consumption: <0.54W
output current: <4A (each channel)
output power: 12V:<192W, 24V:<384W
Working frequency: 880Hz
Dimming mode:PWM
Touch Remote Control
working temperature: -20-60°C
power supply mode: AAA * 2
supply voltage: 1.5V * 2
transmission frequency: 2.4Ghz
standby power consumption: 0.006mW
standby current: 20.3uA
working current: 236uA
emission current: 10mA
remote distance: about 30m
standby time: 6 months
remote control weight: 54.2g
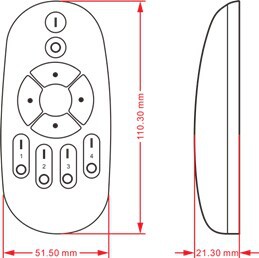
External dimension: L110.3*W51.5*H21.3mm
Light series:143 level
External Dimension (mm)
Interface Specifications
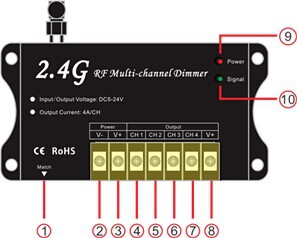
1>.The code button: Match. Usage: Press and hold “Match”, turn on the power, and press the ON key, the load and RF signal indicator flicker 3s, it shows match code succeeds, otherwise repeat the operation.
2>.Power input V+ 3>.Power input V- 4>.The first channel Input
5>.The second channel Input 6>.The third channel Input
7>.The fourth channel Input 8>.common port V+
Key description of remote control
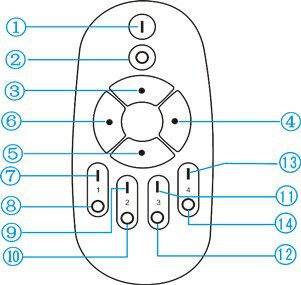
1>.Main on switch: When you press the code button on the controller,long press 3S can match the code. RF signal Indicator and load flicker 3s, showing code operation is successful. Short press is opening the lamp.
2>.Main off switch: Short press closes all the lamp.
3>.custom scenario 1: Long press is saving the current state of lamp to custom scenario 1, when long pressing, RF signal indicator flicker 3s showing it is successfully saved, short press is to open.
4>.custom scenario 2: function as above.
5>.custom scenario 3: function as above.
6>.custom scenario 4: function as above.
7>.The first channel on: short press to open the state of the first channel separate closed last time, press at the first time is to light the first channel. Only after turning on the first channel, it has long press function( that is to short press at first to open the first channel), long press is to increase the brightness of the first channel, in the process, the RF indicator will flicker, when the brightness of first channel is at its maximum, the RF indicator won’t flicker any more.
8>.The first channel off: short press to save the state of the first channel and separate close the first channel, press at the first time is to light the first channel. Only after turning on the first channel, it has long press function( that is to short press at first to open the first channel), long press is to decrease the brightness of the first channel, in the process, the RF indicator will flicker, when the brightness of first channel is at its minimum, the RF indicator won’t flicker any more.
9>.The second channel on: short press to open the state of the second channel separate closed last time, press at the first time is to light the second channel. Only after turning on the second channel, it has long press function( that is to short press at first to open the second channel), long press is to increase the brightness of the second channel, in the process, the RF indicator will flicker, when the brightness of second channel is at its maximum, the RF indicator won’t flicker any more.
10>.The second channel off: short press to save the state of the second channel and separate close the second channel, press at the first time is to light the second channel. Only after turning on the second channel, it has long press function( that is to short press at first to open the second channel), long press is to decrease the brightness of the second channel, in the process, the RF indicator will flicker, when the brightness of second channel is at its minimum, the RF indicator won’t flicker any more.
11>.The third channel on: short press to open the state of the third channel separate closed last time, press at the first time is to light the third channel. Only after turning on the third channel, it has long press function( that is to short press at first to open the third channel), long press is to increase the brightness of the third channel, in the process, the RF indicator will flicker, when the brightness of third channel is at its maximum, the RF indicator won’t flicker any more.
12>.The third channel off: short press to save the state of the third channel and separate close the third channel, press at the first time is to light the third channel. Only after turning on the third channel, it has long press function( that is to short press at first to open the third channel), long press is to decrease the brightness of the third channel, in the process, the RF indicator will flicker, when the brightness of third channel is at its minimum, the RF indicator won’t flicker any more.
13>.The fourth channel on: short press to open the state of the fourth channel separate closed last time, press at the first time is to light the fourth channel. Only after turning on the fourth channel, it has long press function( that is to short press at first to open the fourth channel), long press is to increase the brightness of the fourth channel, in the process, the RF indicator will flicker, when the brightness of fourth channel is at its maximum, the RF indicator won’t flicker any more.
14>.The fourth channel off: short press to save the state of the fourth channel and separate close the fourth channel, press at the first time is to light the fourth channel. Only after turning on the fourth channel, it has long press function( that is to short press at first to open the fourth channel), long press is to decrease the brightness of the fourth channel, in the process, the RF indicator will flicker, when the brightness of fourth channel is at its minimum, the RF indicator won’t flicker any more.
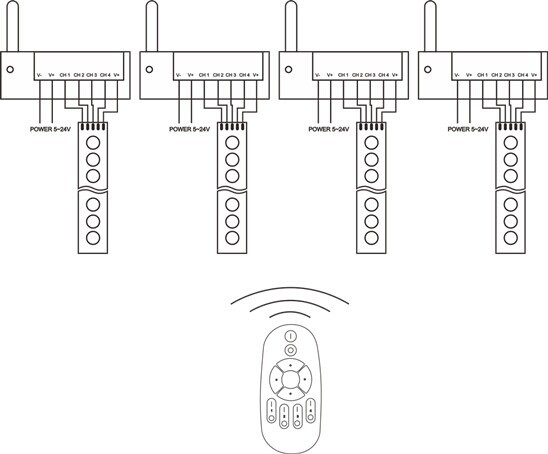
Typical Application
Remarks:
1. Connect the load wire at first, following by the power wire; Please ensure short circuit can not occur between connecting wire before you turn on the power;
2. Power supply voltage range is DC12~24V, more than voltage range maybe burn out the controller.
3. When not use touch remote control for long time, we suggest you to take down the batteries.